Postfix + TLS + SASL2 + Courier-imap ( 建立加密及安全認證之郵件伺服器 )
出处:freebsd.ntut.idv.tw 作者:freebsd.ntut.idv.tw 时间:2006-10-16 15:40:00
Description :
TLS - Transport Layer Security ( 為網路 OSI 七層中的第四層加密技術,SSL - Secure Socket Layer 協定為之前身 )
SASL - Simple Authentication and Security Layer ( 簡易的安全認證,SASL 同時也提供 SMTP 認證,定義在 RFC-2554 http://www.ietf.org/rfc/rfc2554.txt )
Key - 安全連線金鑰 ( key-pair ) CA - 授權憑證 ( Certification Authority )
網路上有些獨立公正單位例如 VeriSign 及 GlobalSign 等等、、、它們就是專門販賣安全金鑰 Key 以及授權憑證 CA 的單位,我們這邊採用自行製作安全金鑰以及授權憑證,自行製作的安全金鑰與授權憑證,在功能上與買來的相同,只是向獨立公正單位購買來的 Key 跟 CA,會讓 Client 使用者心理上覺得比較有保障,因為我們不做生意所以也不需要花錢買Key 跟 CA ,這邊 Postfix + TLS 主要目的是保障我的連線加密防止帳號密碼外洩。
Environment :
硬體:i386 PC Intel Pentium III 500
記憶體:256M RAM
作業系統:FreeBSD 6.0 Release
Setp 1. 伺服器的 SMTP 安全強化
#cd /usr/ports/mail/postfix # 安裝 Postfix MTA 郵件伺服器軟體
#make install clean
※ 出現的第一個選單只選擇 SASL 跟 TLS
[X] SASL2 Cyrus SASLv2 (Simple Authentication and Security Layer)
[X] TLS SSL and TLS
[X] DB41 Berkeley DB4.1 (required if SASL also built with DB4.1)
You need user "postfix" added to group "mail".
Would you like me to add it [y]? y
Would you like to activate Postfix in /etc/mail/mailer.conf [n]? y
# cd /usr/ports/security/cyrus-sasl2-saslauthd # 安裝 cyrus-sasl2-saslauthd
#make install clean
#vi /etc/rc.conf # 關閉 sendmail , 在 FreeBSD 中 Sendmail 預設是開機會自動啟動 127.0.0.1 本機的 MTA 功能,同時也加入開機自動啟動 postfix 及 saslauthd
sendmail_enable="NONE"
postfix_enable="YES"
saslauthd_enable="YES"
#ls -l /usr/local/etc/sasldb* # 查看 sasdb 檔權限因為 postfix 要使用 SASL 認證必須要對 sasldb 有讀取的權限
-rw-r----- 1 cyrus mail 16384 6 13 02:52 sasldb2.db
# vi /etc/group # 把 postfix 代理使用者加入 cyrus 群組 postfix 便可讀取 sasldb 檔
cyrus:*:60:postfix
#vi /usr/local/etc/postfix/main.cf # 修改 postfix 設定檔 main.cf
myhostname = ms1.ntut.idv.tw
mydomain = nttu.idv.tw
alias_maps = hash:/usr/local/etc/postfix/aliases
smtpd_banner = $myhostname ESMTP
myorigin = $myhostname
mynetworks = $myhostname, 127.0.0.1
home_mailbox = Maildir/
broken_sasl_auth_clients = yes
smtpd_sasl_auth_enable= yes
smtpd_sasl_security_options= noanonymous
smtpd_sasl_local_domain =
smtpd_recipient_restrictions = permit_sasl_authenticated, check_relay_domains
#vi master.conf # 修改 master.conf 中的 smtp 及 smtps,smtps 是開 465 port 提供 outlook express 做加密傳輸使用
smtp inet n n n - - smtpd
smtps inet n - n - - smtpd
-o smtpd_tls_wrappermode=yes -o smtpd_sasl_auth_enable=yes
#postalias /usr/local/etc/postfix/aliases # 製做 aliases.db 檔
#vi /usr/local/lib/sasl2/smtpd.conf # 編寫 SASL smtpd 的認證方式採用 plain login
pwcheck_method: saslauthd
mechlist: plain login crammd5 digestmd5
#vi /usr/local/etc/rc.d/saslauthd.sh # 修改 saslauthd.sh
原本 >> saslauthd_flags=${saslauthd_flags:-"-a pam"}
改為 >> saslauthd_flags=${saslauthd_flags:-"-a getpwent"}
#reboot # 重新開機自動啟動 saslauthd 及 postfix
#ps -aux | grep saslauthd # 再次確認 saslauthd 有無啟動
584 ?? Is 0:00.01 /usr/local/sbin/saslauthd -a getpwent
585 ?? I 0:00.00 /usr/local/sbin/saslauthd -a getpwent
586 ?? I 0:00.00 /usr/local/sbin/saslauthd -a getpwent
587 ?? I 0:00.00 /usr/local/sbin/saslauthd -a getpwent
588 ?? I 0:00.00 /usr/local/sbin/saslauthd -a getpwent
#telnet localhost 25 # 測試 25 port 看是否多了兩行 250-AUTH
Trying ::1...
telnet: connect to address ::1: Connection refused
Trying 127.0.0.1...
Connected to localhost.ntut.idv.tw.
Escape character is '^]'.
220 ms1.ntut.idv.tw ESMTP
ehlo locahost
250-ms1.ntut.idv.tw
250-PIPELINING
250-SIZE 10240000
250-VRFY
250-ETRN
250-AUTH NTLM LOGIN PLAIN GSSAPI DIGEST-MD5 CRAM-MD5
250-AUTH=NTLM LOGIN PLAIN GSSAPI DIGEST-MD5 CRAM-MD5
250 8BITMIME
quit
221 Bye
Connection closed by foreign host.
Setp 2. 伺服器的 SMTP 憑證製作
#cd /usr/ports/security/openssl # 安裝 openssl 的目的為產生 CA.pl 這支 perl 程式,好讓我們可以輕鬆產生金鑰
#make install clean
#mkdir /usr/local/etc/postfix/CA # 建立 CA 存放的資料夾
#cd /usr/local/etc/postfix/CA
#cp /usr/local/openssl/misc/CA.pl ./ # 將 CA.pl 這支 perl 程式 copy 到剛剛建立的 CA 目錄
# perl CA.pl -newca
CA certificate filename (or enter to create)
Making CA certificate ...
Generating a 1024 bit RSA private key
.++++++
.......................++++++
writing new private key to './demoCA/private/cakey.pem'
Enter PEM pass phrase: ( 輸入密碼 )
Verifying - Enter PEM pass phrase: ( 輸入密碼 )
-----
You are about to be asked to enter information that will be incorporated
into your certificate request.
What you are about to enter is what is called a Distinguished Name or a DN.
There are quite a few fields but you can leave some blank
For some fields there will be a default value,
If you enter '.', the field will be left blank.
-----
Country Name (2 letter code) [AU]:TW
State or Province Name (full name) [Some-State]:Taiwan
Locality Name (eg, city) []:Taichung
Organization Name (eg, company) [Internet Widgits Pty Ltd]:ERA
Organizational Unit Name (eg, section) []:ISP
Common Name (eg, YOUR name) []:ms1.ntut.idv.tw
Email Address []:xxxxx@gmail.com
#openssl req -nodes -config /usr/local/openssl/openssl.cnf -new -days 3650 -newkey rsa:1024 -keyout serverkey.pem -out serverreq.pem
Generating a 1024 bit RSA private key
......++++++
...............++++++
writing new private key to 'serverkey.pem'
-----
You are about to be asked to enter information that will be incorporated
into your certificate request.
What you are about to enter is what is called a Distinguished Name or a DN.
There are quite a few fields but you can leave some blank
For some fields there will be a default value,
If you enter '.', the field will be left blank.
-----
Country Name (2 letter code) [AU]:TW
State or Province Name (full name) [Some-State]:Taiwan
Locality Name (eg, city) []:Taichung
Organization Name (eg, company) [Internet Widgits Pty Ltd]:ERA
Organizational Unit Name (eg, section) []:ISP
Common Name (eg, YOUR name) []:ms1.ntut.idv.tw
Email Address []:xxxxxx@gmail.com
Please enter the following 'extra' attributes
to be sent with your certificate request
A challenge password []: ( 輸入密碼 )
An optional company name []:ERA
#openssl ca -config /usr/local/openssl/openssl.cnf -policy policy_anything -out servercert.pem -infiles serverreq.pem
Using configuration from /usr/local/openssl/openssl.cnf
Enter pass phrase for ./demoCA/private/cakey.pem:
Check that the request matches the signature
Signature ok
Certificate Details:
Serial Number:
96:a5:d5:76:64:ad:3f:31
Validity
Not Before: Apr 13 01:52:30 2006 GMT
Not After : Apr 13 01:52:30 2007 GMT
Subject:
countryName = TW
stateOrProvinceName = Taiwan
localityName = Taichung
organizationName = ERA
organizationalUnitName = ISP
commonName = ms1.ntut.idv.tw
emailAddress = xxxxx@gmail.com
X509v3 extensions:
X509v3 Basic Constraints:
CA:FALSE
Netscape Comment:
OpenSSL Generated Certificate
X509v3 Subject Key Identifier:
32:98:18:2A:98:B9:03:EC:A2:A9:E5:1A:C9:09:82:6B:95:5D:D2:D3
X509v3 Authority Key Identifier:
keyid:66:9D:78:67:61:75:95:B0:60:72:59:F5:77:4B:83:0D:D1:E4:B7:E8
DirName:/C=TW/ST=Taiwan/L=Taichung/O=ERA/OU=ISP/CN=ms1.ntut.idv.tw/emailAddress=xxxxx@gmail.com
serial:96:A5:D5:76:64:AD:3F:30
Certificate is to be certified until Apr 13 01:52:30 2007 GMT (365 days)
Sign the certificate? [y/n]:y
1 out of 1 certificate requests certified, commit? [y/n]y
Write out database with 1 new entries
Data Base Updated
#cat serverkey.pem servercert.pem > post.pem
#vi /usr/local/etc/postfix/main.cf # 將 Postfix 的 smtpd 加入 TLS 設定
smtp_use_tls = yes
smtpd_use_tls = yes
smtp_tls_note_starttls_offer = yes
smtpd_tls_key_file = /usr/local/etc/postfix/CA/post.pem
smtpd_tls_cert_file = /usr/local/etc/postfix/CA/post.pem
smtpd_tls_CAfile = /usr/local/etc/postfix/CA/post.pem
smtpd_tls_loglevel = 1
smtpd_tls_received_header = yes
mtpd_tls_session_cache_timeout = 3600s
tls_random_source = dev:/dev/urandom
#postfix reload # 重新啟動 postfix
#telnet loadlhost 25 # 測試是否啟動 TLS 加密,手動輸入 STARTTLS 如果成功會回應下面那行紅字
Trying ::1...
telnet: connect to address ::1: Connection refused
Trying 127.0.0.1...
Connected to localhost.ntut.idv.tw.
Escape character is '^]'.
220 ms1.ntut.idv.tw ESMTP
ehlo localhost
250-ms1.ntut.idv.tw
250-PIPELINING
250-SIZE 10240000
250-VRFY
250-ETRN
250-STARTTLS
250-AUTH NTLM LOGIN PLAIN GSSAPI DIGEST-MD5 CRAM-MD5
250-AUTH=NTLM LOGIN PLAIN GSSAPI DIGEST-MD5 CRAM-MD5
250 8BITMIME
STARTTLS
220 Ready to start TLS
quit
quit
221 Bye
Connection closed by foreign host.
※ SMTP 在 Client 端設定方式若以 Outlook Express 的設定方式如下:
圖 (一)、讓 Outlook Express 支援驗證 ( 可預防 Mail Relay )
在 Outlook Express 《工具》《帳戶》《郵件》《內容》《伺服器》中
把『 外寄郵件伺服器 』、『 我的外寄伺服器需要驗證 』打勾,就可以使用身分認證機制。
圖 (二)、讓 Outlook Express 支援 SSL/TLS 加密的郵件伺服器 ( 加密後可預防帳號密碼資料被竊取,就算資料被從中竊取也是加密的資料很難破解 )。
必須向使用 Outlook Express 的使者宣導改用 SSL/TLS 來做寄信的動作,客戶端只要在 Outlook Express 《工具》《帳戶》《郵件》《內容》《進階》中
將『 伺機器連接戶號碼 』、『 外寄伺服器 - SMTP 』的 port 號從 25 port 改到 465 port 以及『 這個伺服器需要安全連線 - SSL 』打勾,就可以採用 TLS 加密連線了。
圖 (一)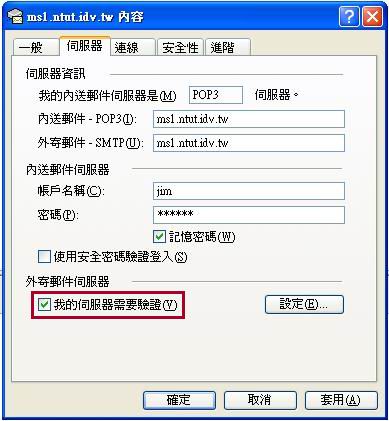 圖 (二)
圖 (二) 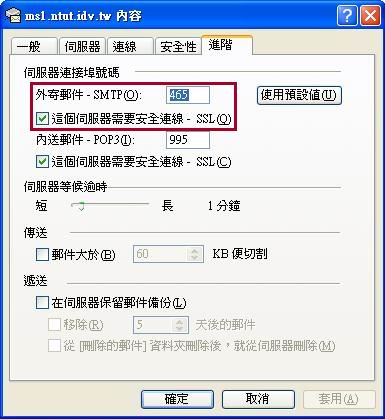
Setp 3. 設定 POP3 及 IMAP 加密
#cd /usr/ports/mail/courier-imap # 光讓發信 SMTP 加密還不夠,POP3 收信也得加密,這邊因為我們的 Postfix 採用 Maildir 格式所以我們安裝 Courier-imap
#make install
Options for courier-imap 4.0.6_1,1
[X] OPENSSL Build with OpenSSL support # 因為採用 FreeBSD 本機上的帳號及密碼認證所以只選 openssl 不選其他種類的 AUTH
#cd /usr/local/etc/courier-imap
#cp pop3d.cnf.dist pop3d.cnf # 設定 POP3s 995 port 金鑰產生設定檔
RANDFILE = /usr/local/share/courier-imap/pop3d.rand
[ req ]
default_bits = 1024
encrypt_key = yes
distinguished_name = req_dn
x509_extensions = cert_type
prompt = no
[ req_dn ]
C=TW
ST=Taiwan
L=Taichung
O=ERA
OU=ISP
CN=localhost
emailAddress=xxxxx@gmail.com
[ cert_type ]
nsCertType = server
#cp imapd.cnf.dist imapd.cnf # 設定 IMAPs 993 port 金鑰產生設定檔
RANDFILE = /usr/local/share/courier-imap/imapd.rand
[ req ]
default_bits = 1024
encrypt_key = yes
distinguished_name = req_dn
x509_extensions = cert_type
prompt = no
[ req_dn ]
C=TW
ST=Taiwan
L=Taichung
O=ERA
OU=ISP
CN=localhost
emailAddress=xxxxx@gmail.com
[ cert_type ]
nsCertType = server
#/usr/local/sbin/mkimapdcert # 開始產生安全登入認證的金鑰 imapd.pem 及 pop3d.pem 檔,放置於 /usr/local/share/courier-iamp 下
#/usr/local/sbin/mkpop3dcert
#vi /etc/rc.conf # 設定預設開機啟動程式
courier_authdaemond_enable="YES"
courier_imap_imapd_ssl_enable="YES"
courier_imap_pop3d_ssl_enable="YES"
#/usr/local/etc/rc.d/courier-authdaemond.sh start
#/usr/local/etc/rc.d/courier-imap-pop3d-ssl.sh start # 啟動 pop3s
#/usr/local/etc/rc.d/courier-imap-imapd-ssl.sh start # 啟動 imaps
# sockstat -l4 # 確定開啟的服務 port
USER COMMAND PID FD PROTO LOCAL ADDRESS FOREIGN ADDRESS
root couriertcp 59481 3 tcp4 *:993 *:*
root couriertcp 59470 3 tcp4 *:995 *:*
root master 15580 11 tcp4 *:25 *:*
root master 15580 14 tcp4 *:465 *:*
root sshd 441 4 tcp4 *:22 *:*
※ POP3 在 Client 端設定方式若以 Outlook Express 的設定方式如下:
必須向使用 Outlook Express 的使者宣導改用 SSL/TLS 來收信,同時我們也關掉 110 port 讓這個不安全的協定 port 不再運行,客戶端只要在 Outlook Express 《工具》《帳戶》《郵件》《內容》《進階》中
將『 伺機器連接戶號碼 』、『 外寄伺服器 - POP3 』的 port 號從 110 port 改到 995 port 以及將『 這個伺服器需要安全連線 - SSL 』打勾,就可以採用加密連線了。
圖 (三)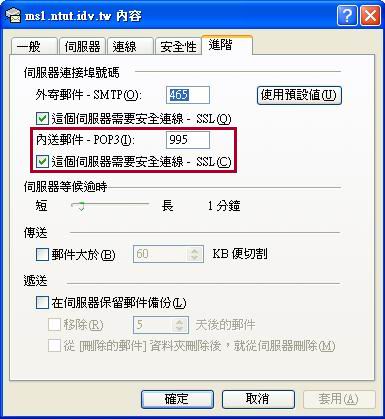
參考資料:
http://www.hacker.org.tw/?c=articles_show&articleid=1225
http://www.ascc.sinica.edu.tw/nl/90/1713/02.txt
最後修改日期: 2006/04/14
最後修改:http://freebsd.ntut.idv.tw/document/postfix_tls_sasl2_courier-imap.html
TLS - Transport Layer Security ( 為網路 OSI 七層中的第四層加密技術,SSL - Secure Socket Layer 協定為之前身 )
SASL - Simple Authentication and Security Layer ( 簡易的安全認證,SASL 同時也提供 SMTP 認證,定義在 RFC-2554 http://www.ietf.org/rfc/rfc2554.txt )
Key - 安全連線金鑰 ( key-pair ) CA - 授權憑證 ( Certification Authority )
網路上有些獨立公正單位例如 VeriSign 及 GlobalSign 等等、、、它們就是專門販賣安全金鑰 Key 以及授權憑證 CA 的單位,我們這邊採用自行製作安全金鑰以及授權憑證,自行製作的安全金鑰與授權憑證,在功能上與買來的相同,只是向獨立公正單位購買來的 Key 跟 CA,會讓 Client 使用者心理上覺得比較有保障,因為我們不做生意所以也不需要花錢買Key 跟 CA ,這邊 Postfix + TLS 主要目的是保障我的連線加密防止帳號密碼外洩。
Environment :
硬體:i386 PC Intel Pentium III 500
記憶體:256M RAM
作業系統:FreeBSD 6.0 Release
Setp 1. 伺服器的 SMTP 安全強化
#cd /usr/ports/mail/postfix # 安裝 Postfix MTA 郵件伺服器軟體
#make install clean
※ 出現的第一個選單只選擇 SASL 跟 TLS
[X] SASL2 Cyrus SASLv2 (Simple Authentication and Security Layer)
[X] TLS SSL and TLS
[X] DB41 Berkeley DB4.1 (required if SASL also built with DB4.1)
You need user "postfix" added to group "mail".
Would you like me to add it [y]? y
Would you like to activate Postfix in /etc/mail/mailer.conf [n]? y
# cd /usr/ports/security/cyrus-sasl2-saslauthd # 安裝 cyrus-sasl2-saslauthd
#make install clean
#vi /etc/rc.conf # 關閉 sendmail , 在 FreeBSD 中 Sendmail 預設是開機會自動啟動 127.0.0.1 本機的 MTA 功能,同時也加入開機自動啟動 postfix 及 saslauthd
sendmail_enable="NONE"
postfix_enable="YES"
saslauthd_enable="YES"
#ls -l /usr/local/etc/sasldb* # 查看 sasdb 檔權限因為 postfix 要使用 SASL 認證必須要對 sasldb 有讀取的權限
-rw-r----- 1 cyrus mail 16384 6 13 02:52 sasldb2.db
# vi /etc/group # 把 postfix 代理使用者加入 cyrus 群組 postfix 便可讀取 sasldb 檔
cyrus:*:60:postfix
#vi /usr/local/etc/postfix/main.cf # 修改 postfix 設定檔 main.cf
myhostname = ms1.ntut.idv.tw
mydomain = nttu.idv.tw
alias_maps = hash:/usr/local/etc/postfix/aliases
smtpd_banner = $myhostname ESMTP
myorigin = $myhostname
mynetworks = $myhostname, 127.0.0.1
home_mailbox = Maildir/
broken_sasl_auth_clients = yes
smtpd_sasl_auth_enable= yes
smtpd_sasl_security_options= noanonymous
smtpd_sasl_local_domain =
smtpd_recipient_restrictions = permit_sasl_authenticated, check_relay_domains
#vi master.conf # 修改 master.conf 中的 smtp 及 smtps,smtps 是開 465 port 提供 outlook express 做加密傳輸使用
smtp inet n n n - - smtpd
smtps inet n - n - - smtpd
-o smtpd_tls_wrappermode=yes -o smtpd_sasl_auth_enable=yes
#postalias /usr/local/etc/postfix/aliases # 製做 aliases.db 檔
#vi /usr/local/lib/sasl2/smtpd.conf # 編寫 SASL smtpd 的認證方式採用 plain login
pwcheck_method: saslauthd
mechlist: plain login crammd5 digestmd5
#vi /usr/local/etc/rc.d/saslauthd.sh # 修改 saslauthd.sh
原本 >> saslauthd_flags=${saslauthd_flags:-"-a pam"}
改為 >> saslauthd_flags=${saslauthd_flags:-"-a getpwent"}
#reboot # 重新開機自動啟動 saslauthd 及 postfix
#ps -aux | grep saslauthd # 再次確認 saslauthd 有無啟動
584 ?? Is 0:00.01 /usr/local/sbin/saslauthd -a getpwent
585 ?? I 0:00.00 /usr/local/sbin/saslauthd -a getpwent
586 ?? I 0:00.00 /usr/local/sbin/saslauthd -a getpwent
587 ?? I 0:00.00 /usr/local/sbin/saslauthd -a getpwent
588 ?? I 0:00.00 /usr/local/sbin/saslauthd -a getpwent
#telnet localhost 25 # 測試 25 port 看是否多了兩行 250-AUTH
Trying ::1...
telnet: connect to address ::1: Connection refused
Trying 127.0.0.1...
Connected to localhost.ntut.idv.tw.
Escape character is '^]'.
220 ms1.ntut.idv.tw ESMTP
ehlo locahost
250-ms1.ntut.idv.tw
250-PIPELINING
250-SIZE 10240000
250-VRFY
250-ETRN
250-AUTH NTLM LOGIN PLAIN GSSAPI DIGEST-MD5 CRAM-MD5
250-AUTH=NTLM LOGIN PLAIN GSSAPI DIGEST-MD5 CRAM-MD5
250 8BITMIME
quit
221 Bye
Connection closed by foreign host.
Setp 2. 伺服器的 SMTP 憑證製作
#cd /usr/ports/security/openssl # 安裝 openssl 的目的為產生 CA.pl 這支 perl 程式,好讓我們可以輕鬆產生金鑰
#make install clean
#mkdir /usr/local/etc/postfix/CA # 建立 CA 存放的資料夾
#cd /usr/local/etc/postfix/CA
#cp /usr/local/openssl/misc/CA.pl ./ # 將 CA.pl 這支 perl 程式 copy 到剛剛建立的 CA 目錄
# perl CA.pl -newca
CA certificate filename (or enter to create)
Making CA certificate ...
Generating a 1024 bit RSA private key
.++++++
.......................++++++
writing new private key to './demoCA/private/cakey.pem'
Enter PEM pass phrase: ( 輸入密碼 )
Verifying - Enter PEM pass phrase: ( 輸入密碼 )
-----
You are about to be asked to enter information that will be incorporated
into your certificate request.
What you are about to enter is what is called a Distinguished Name or a DN.
There are quite a few fields but you can leave some blank
For some fields there will be a default value,
If you enter '.', the field will be left blank.
-----
Country Name (2 letter code) [AU]:TW
State or Province Name (full name) [Some-State]:Taiwan
Locality Name (eg, city) []:Taichung
Organization Name (eg, company) [Internet Widgits Pty Ltd]:ERA
Organizational Unit Name (eg, section) []:ISP
Common Name (eg, YOUR name) []:ms1.ntut.idv.tw
Email Address []:xxxxx@gmail.com
#openssl req -nodes -config /usr/local/openssl/openssl.cnf -new -days 3650 -newkey rsa:1024 -keyout serverkey.pem -out serverreq.pem
Generating a 1024 bit RSA private key
......++++++
...............++++++
writing new private key to 'serverkey.pem'
-----
You are about to be asked to enter information that will be incorporated
into your certificate request.
What you are about to enter is what is called a Distinguished Name or a DN.
There are quite a few fields but you can leave some blank
For some fields there will be a default value,
If you enter '.', the field will be left blank.
-----
Country Name (2 letter code) [AU]:TW
State or Province Name (full name) [Some-State]:Taiwan
Locality Name (eg, city) []:Taichung
Organization Name (eg, company) [Internet Widgits Pty Ltd]:ERA
Organizational Unit Name (eg, section) []:ISP
Common Name (eg, YOUR name) []:ms1.ntut.idv.tw
Email Address []:xxxxxx@gmail.com
Please enter the following 'extra' attributes
to be sent with your certificate request
A challenge password []: ( 輸入密碼 )
An optional company name []:ERA
#openssl ca -config /usr/local/openssl/openssl.cnf -policy policy_anything -out servercert.pem -infiles serverreq.pem
Using configuration from /usr/local/openssl/openssl.cnf
Enter pass phrase for ./demoCA/private/cakey.pem:
Check that the request matches the signature
Signature ok
Certificate Details:
Serial Number:
96:a5:d5:76:64:ad:3f:31
Validity
Not Before: Apr 13 01:52:30 2006 GMT
Not After : Apr 13 01:52:30 2007 GMT
Subject:
countryName = TW
stateOrProvinceName = Taiwan
localityName = Taichung
organizationName = ERA
organizationalUnitName = ISP
commonName = ms1.ntut.idv.tw
emailAddress = xxxxx@gmail.com
X509v3 extensions:
X509v3 Basic Constraints:
CA:FALSE
Netscape Comment:
OpenSSL Generated Certificate
X509v3 Subject Key Identifier:
32:98:18:2A:98:B9:03:EC:A2:A9:E5:1A:C9:09:82:6B:95:5D:D2:D3
X509v3 Authority Key Identifier:
keyid:66:9D:78:67:61:75:95:B0:60:72:59:F5:77:4B:83:0D:D1:E4:B7:E8
DirName:/C=TW/ST=Taiwan/L=Taichung/O=ERA/OU=ISP/CN=ms1.ntut.idv.tw/emailAddress=xxxxx@gmail.com
serial:96:A5:D5:76:64:AD:3F:30
Certificate is to be certified until Apr 13 01:52:30 2007 GMT (365 days)
Sign the certificate? [y/n]:y
1 out of 1 certificate requests certified, commit? [y/n]y
Write out database with 1 new entries
Data Base Updated
#cat serverkey.pem servercert.pem > post.pem
#vi /usr/local/etc/postfix/main.cf # 將 Postfix 的 smtpd 加入 TLS 設定
smtp_use_tls = yes
smtpd_use_tls = yes
smtp_tls_note_starttls_offer = yes
smtpd_tls_key_file = /usr/local/etc/postfix/CA/post.pem
smtpd_tls_cert_file = /usr/local/etc/postfix/CA/post.pem
smtpd_tls_CAfile = /usr/local/etc/postfix/CA/post.pem
smtpd_tls_loglevel = 1
smtpd_tls_received_header = yes
mtpd_tls_session_cache_timeout = 3600s
tls_random_source = dev:/dev/urandom
#postfix reload # 重新啟動 postfix
#telnet loadlhost 25 # 測試是否啟動 TLS 加密,手動輸入 STARTTLS 如果成功會回應下面那行紅字
Trying ::1...
telnet: connect to address ::1: Connection refused
Trying 127.0.0.1...
Connected to localhost.ntut.idv.tw.
Escape character is '^]'.
220 ms1.ntut.idv.tw ESMTP
ehlo localhost
250-ms1.ntut.idv.tw
250-PIPELINING
250-SIZE 10240000
250-VRFY
250-ETRN
250-STARTTLS
250-AUTH NTLM LOGIN PLAIN GSSAPI DIGEST-MD5 CRAM-MD5
250-AUTH=NTLM LOGIN PLAIN GSSAPI DIGEST-MD5 CRAM-MD5
250 8BITMIME
STARTTLS
220 Ready to start TLS
quit
quit
221 Bye
Connection closed by foreign host.
※ SMTP 在 Client 端設定方式若以 Outlook Express 的設定方式如下:
圖 (一)、讓 Outlook Express 支援驗證 ( 可預防 Mail Relay )
在 Outlook Express 《工具》《帳戶》《郵件》《內容》《伺服器》中
把『 外寄郵件伺服器 』、『 我的外寄伺服器需要驗證 』打勾,就可以使用身分認證機制。
圖 (二)、讓 Outlook Express 支援 SSL/TLS 加密的郵件伺服器 ( 加密後可預防帳號密碼資料被竊取,就算資料被從中竊取也是加密的資料很難破解 )。
必須向使用 Outlook Express 的使者宣導改用 SSL/TLS 來做寄信的動作,客戶端只要在 Outlook Express 《工具》《帳戶》《郵件》《內容》《進階》中
將『 伺機器連接戶號碼 』、『 外寄伺服器 - SMTP 』的 port 號從 25 port 改到 465 port 以及『 這個伺服器需要安全連線 - SSL 』打勾,就可以採用 TLS 加密連線了。
圖 (一)
圖 (二) Setp 3. 設定 POP3 及 IMAP 加密
#cd /usr/ports/mail/courier-imap # 光讓發信 SMTP 加密還不夠,POP3 收信也得加密,這邊因為我們的 Postfix 採用 Maildir 格式所以我們安裝 Courier-imap
#make install
Options for courier-imap 4.0.6_1,1
[X] OPENSSL Build with OpenSSL support # 因為採用 FreeBSD 本機上的帳號及密碼認證所以只選 openssl 不選其他種類的 AUTH
#cd /usr/local/etc/courier-imap
#cp pop3d.cnf.dist pop3d.cnf # 設定 POP3s 995 port 金鑰產生設定檔
RANDFILE = /usr/local/share/courier-imap/pop3d.rand
[ req ]
default_bits = 1024
encrypt_key = yes
distinguished_name = req_dn
x509_extensions = cert_type
prompt = no
[ req_dn ]
C=TW
ST=Taiwan
L=Taichung
O=ERA
OU=ISP
CN=localhost
emailAddress=xxxxx@gmail.com
[ cert_type ]
nsCertType = server
#cp imapd.cnf.dist imapd.cnf # 設定 IMAPs 993 port 金鑰產生設定檔
RANDFILE = /usr/local/share/courier-imap/imapd.rand
[ req ]
default_bits = 1024
encrypt_key = yes
distinguished_name = req_dn
x509_extensions = cert_type
prompt = no
[ req_dn ]
C=TW
ST=Taiwan
L=Taichung
O=ERA
OU=ISP
CN=localhost
emailAddress=xxxxx@gmail.com
[ cert_type ]
nsCertType = server
#/usr/local/sbin/mkimapdcert # 開始產生安全登入認證的金鑰 imapd.pem 及 pop3d.pem 檔,放置於 /usr/local/share/courier-iamp 下
#/usr/local/sbin/mkpop3dcert
#vi /etc/rc.conf # 設定預設開機啟動程式
courier_authdaemond_enable="YES"
courier_imap_imapd_ssl_enable="YES"
courier_imap_pop3d_ssl_enable="YES"
#/usr/local/etc/rc.d/courier-authdaemond.sh start
#/usr/local/etc/rc.d/courier-imap-pop3d-ssl.sh start # 啟動 pop3s
#/usr/local/etc/rc.d/courier-imap-imapd-ssl.sh start # 啟動 imaps
# sockstat -l4 # 確定開啟的服務 port
USER COMMAND PID FD PROTO LOCAL ADDRESS FOREIGN ADDRESS
root couriertcp 59481 3 tcp4 *:993 *:*
root couriertcp 59470 3 tcp4 *:995 *:*
root master 15580 11 tcp4 *:25 *:*
root master 15580 14 tcp4 *:465 *:*
root sshd 441 4 tcp4 *:22 *:*
※ POP3 在 Client 端設定方式若以 Outlook Express 的設定方式如下:
必須向使用 Outlook Express 的使者宣導改用 SSL/TLS 來收信,同時我們也關掉 110 port 讓這個不安全的協定 port 不再運行,客戶端只要在 Outlook Express 《工具》《帳戶》《郵件》《內容》《進階》中
將『 伺機器連接戶號碼 』、『 外寄伺服器 - POP3 』的 port 號從 110 port 改到 995 port 以及將『 這個伺服器需要安全連線 - SSL 』打勾,就可以採用加密連線了。
圖 (三)
參考資料:
http://www.hacker.org.tw/?c=articles_show&articleid=1225
http://www.ascc.sinica.edu.tw/nl/90/1713/02.txt
最後修改日期: 2006/04/14
最後修改:http://freebsd.ntut.idv.tw/document/postfix_tls_sasl2_courier-imap.html
| 自由广告区 |
| 分类导航 |
| 邮件新闻资讯: IT业界 | 邮件服务器 | 邮件趣闻 | 移动电邮 电子邮箱 | 反垃圾邮件|邮件客户端|网络安全 行业数据 | 邮件人物 | 网站公告 | 行业法规 网络技术: 邮件原理 | 网络协议 | 网络管理 | 传输介质 线路接入 | 路由接口 | 邮件存储 | 华为3Com CISCO技术 | 网络与服务器硬件 操作系统: Windows 9X | Linux&Uinx | Windows NT Windows Vista | FreeBSD | 其它操作系统 邮件服务器: 程序与开发 | Exchange | Qmail | Postfix Sendmail | MDaemon | Domino | Foxmail KerioMail | JavaMail | Winwebmail |James Merak&VisNetic | CMailServer | WinMail 金笛邮件系统 | 其它 | 反垃圾邮件: 综述| 客户端反垃圾邮件|服务器端反垃圾邮件 邮件客户端软件: Outlook | Foxmail | DreamMail| KooMail The bat | 雷鸟 | Eudora |Becky! |Pegasus IncrediMail |其它 电子邮箱: 个人邮箱 | 企业邮箱 |Gmail 移动电子邮件:服务器 | 客户端 | 技术前沿 邮件网络安全: 软件漏洞 | 安全知识 | 病毒公告 |防火墙 攻防技术 | 病毒查杀| ISA | 数字签名 邮件营销: Email营销 | 网络营销 | 营销技巧 |营销案例 邮件人才:招聘 | 职场 | 培训 | 指南 | 职场 解决方案: 邮件系统|反垃圾邮件 |安全 |移动电邮 |招标 产品评测: 邮件系统 |反垃圾邮件 |邮箱 |安全 |客户端 |